How to Set Up Your Proxies With the Waterfox Browser
Boost your online security: strengthen your digital identity and browse safely with Smartproxy proxies and the Waterfox browser.
14-day money-back option

65M+ IPs

195+ locations

99.68% success rate

Advanced proxy rotation

Unlimited connections

24/7 tech support
What is the Waterfox browser?

Waterfox is a fast and modern browser focused on online security and user privacy. It features built-in tracking protection, private tabs, and DNS over Oblivious HTTP, making your online activity harder for your ISP provider to track. Compared to other browsers, Waterfox doesn’t collect any usage data, so you can feel safe that your information stays with you and only you.
Why proxies?

Waterfox allows you to set up proxies for your connections, further enhancing your online security. You can never be too careful, right?
Residential proxies are a great option, as they are built on real home devices that make your connections appear natural and human-like. Smartproxy offers residential proxies with a massive pool of 55M+ IPs from over 195 locations worldwide, ensuring your browsing activity remains untraceable and anonymous.
Another cool thing is datacenter proxies. They are low-cost, stable, and fast proxies built on remote computers that are perfect for tasks that require quick response times and reliable connections. With our datacenter proxies, you can be sure to have a 99.99% uptime, <0.3s response times, unlimited connections and threads, and the ability to scale your infrastructure according to your needs.
How to add proxies to Waterfox?
Set up Smartproxy’s proxies with the Waterfox browser
If you haven’t done so, install the Waterfox browser from their website. Select your operating system, download it, and go through the installation process. Once you’re done, launch the application, and you’ll arrive at a new tab window. The interface needs no explanation as it is simple and intuitive, especially if you’ve used Firefox or similar web browsers. You can play around with it and see how it works, test its features, change some settings, and get comfortable with it.
If you’re using an older operating system, you might also be interested in a classic version called Waterfox Classic. However, remember that it’s an old version with several vulnerabilities and bugs and won’t have most of the features included in the newest version.
Once you’re all set and ready, let’s not hesitate and set up our proxies to browse safely from the beginning:
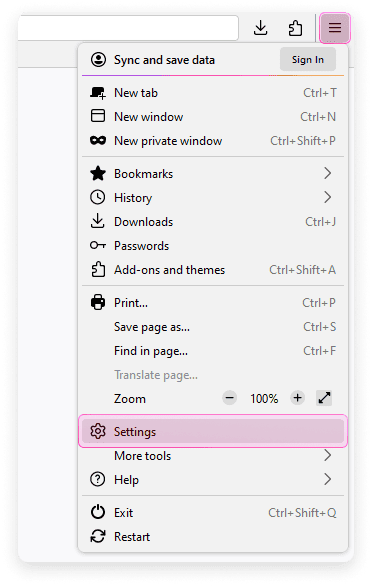
1. In the top right corner, open the menu and click Settings.
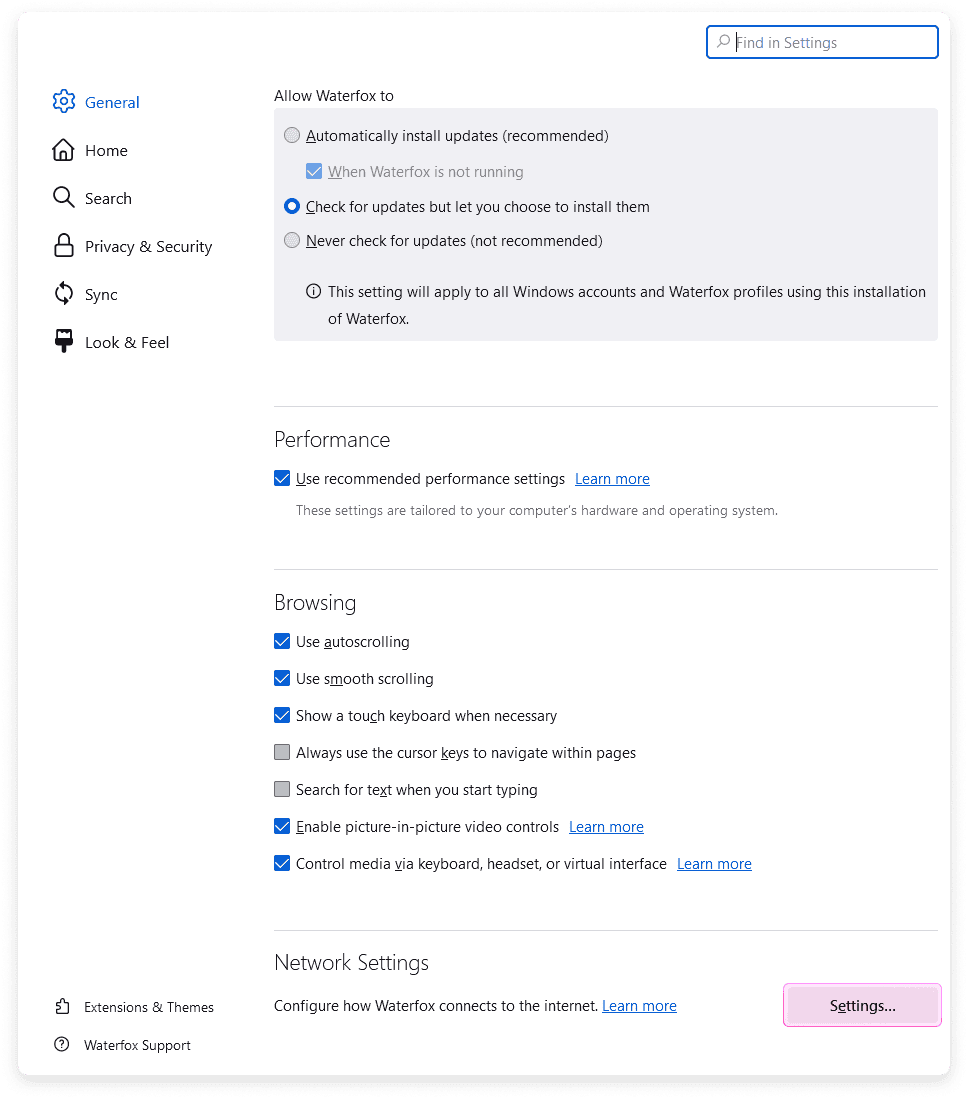
2. In the General tab, scroll to the bottom and find the Network Settings section. You can also use the search bar at the top to find it more easily.
3. Click Settings…
4. Select Manual proxy configuration found under Configure Proxy Access to the Internet.
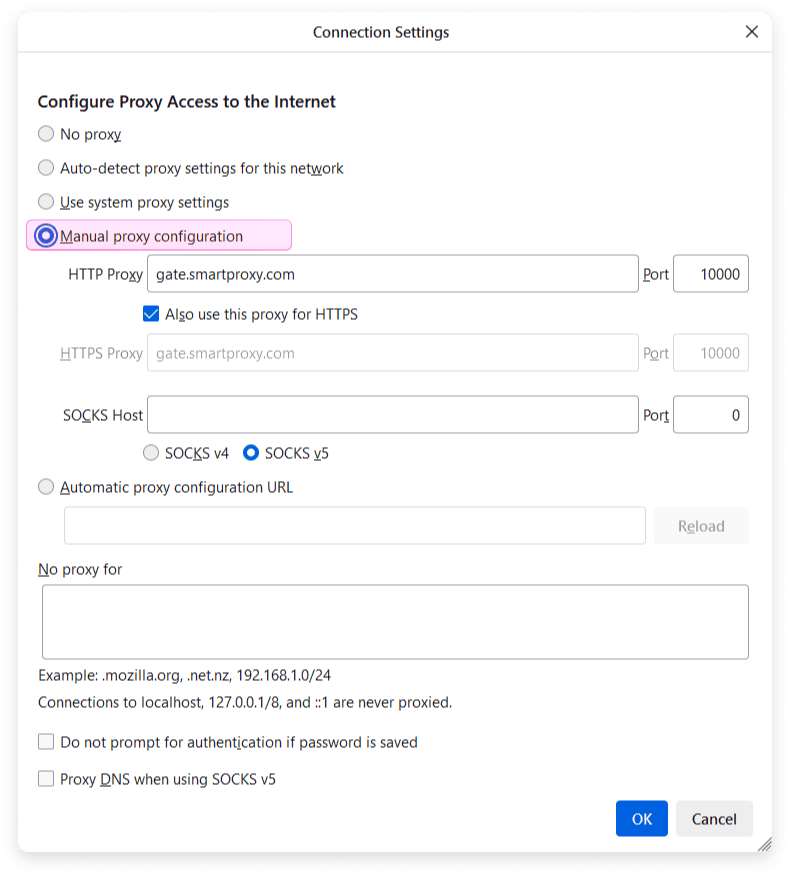
From this point, you can approach it in two ways: set up residential or datacenter proxies.
Integration with residential proxies
To set up Waterfox with Smartproxy’s residential proxies, follow these steps:
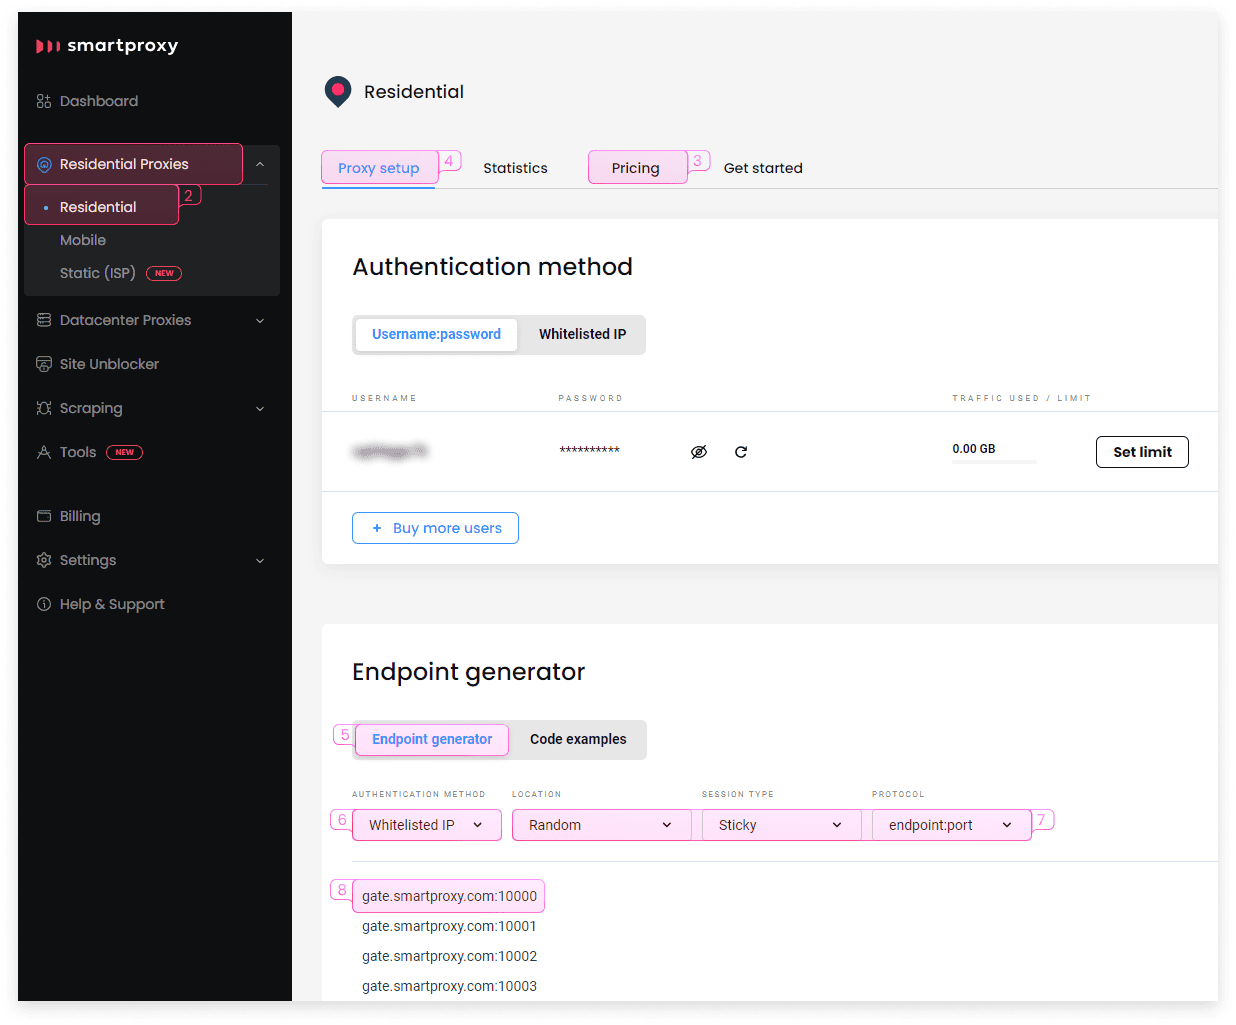
1. Open the Smartproxy dashboard.
2. Select Residential proxies from the sidebar and then Residential.
3. Purchase a plan that best suits your needs.
4. Open the Proxy setup tab.
5. Navigate to the Endpoint generator.
6. For the Authentication method, select Whitelisted IP. While we aren’t necessarily going to use this method, it will create an easy-to-copy endpoint string.
7. Select other necessary parameters, such as location and session type, and set the protocol as endpoint:port.
8. Copy one of the generated endpoints.
9. Return to Waterfox’s Manual proxy configuration window and paste the generated endpoint in the HTTP Proxy, HTTPS Proxy, or SOCKS Host input fields. Make sure to separate the port number and enter it in a separate field on the right side.
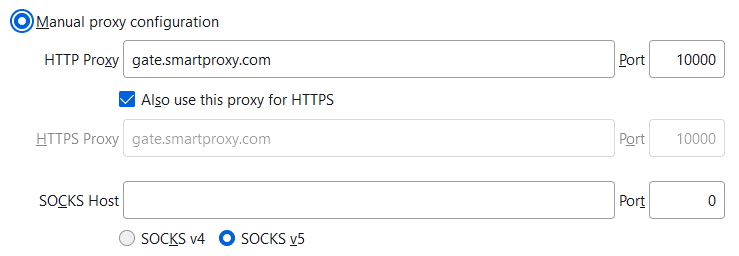
10. Click OK to save your configuration.

And you’re done! You’ll now browse the internet through a configured proxy server using the Waterfox browser.
Integration with datacenter proxies
To set up Waterfox with Smartproxy’s datacenter proxies, follow these steps:
1. Open the Smartproxy dashboard.
2. Select Datacenter proxies from the sidebar and then Datacenter (Pay/GB), Datacenter (Pay/IP), or Dedicated Datacenter.
3. Purchase a plan that best suits your needs.
4. Open the Proxy setup tab.
5. Navigate to the Endpoint generator.
6. Select the necessary parameters, such as proxy location and session type. The choice of output format doesn’t matter, as you’ll only take a part of it. Leave it as endpoint:port.
7. Copy one of the generated endpoints.
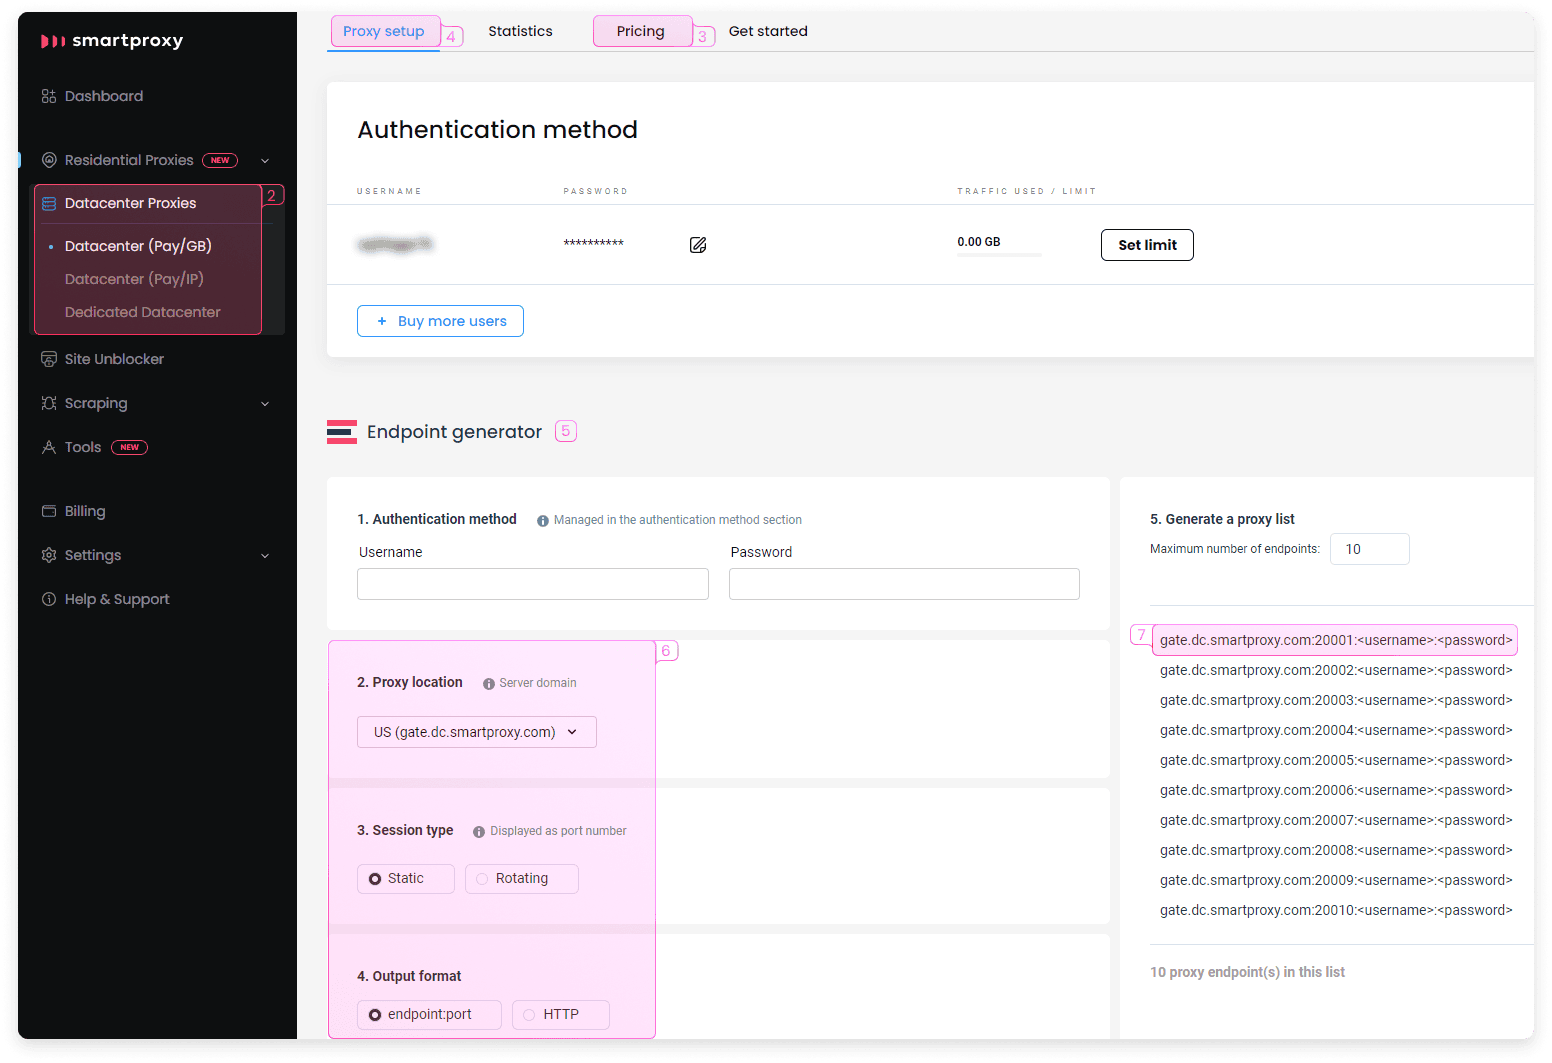
8. Return to Waterfox’s Manual proxy configuration window and paste the generated endpoint in the HTTP Proxy, HTTPS Proxy, or SOCKS Host input fields. You’ll only need the endpoint part without the username and password (ex. gate.dc.smartproxy.com). The port number must be entered in a separate field on the right side.
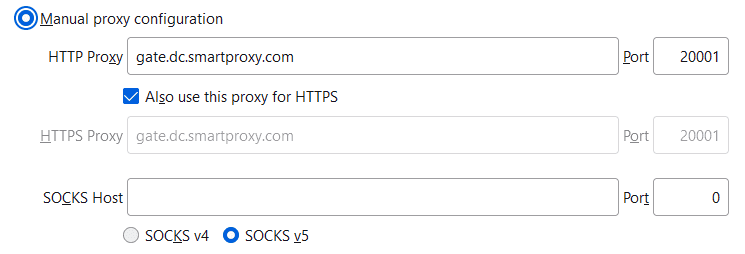
9. Click OK to save your configuration.

10. Enter any website’s page by entering an address in the URL bar. You’ll be prompted to enter your username and password for authentication. Copy them from your dashboard, paste them, and click Sign in.
That’s all! You’re now browsing the web through datacenter proxies. Sometimes, you might get an alert window and must re-enter your authentication details, so ensure you’ve got them saved.
Further customization
There are several more options in the Connection Settings window that you might find helpful:
- No proxy for – enter a list of website URLs or IP addresses you want to connect to without a proxy. Values need to be separated by commas.
- Do not prompt for authentication if the password is saved – you’ll sometimes get a prompt to re-enter your credentials while you browse various sites. However, if you saved your password before and then select this option, it will not require it. This can significantly improve your experience without those extra annoying pop-ups getting in your way.
- Proxy DNS when using SOCKS v5 – by default, this option is disabled, and DNS lookup happens through your main connection instead of a proxy. Check this option if you want to perform it through the SOCKS v5 protocol instead.
Choose the best proxy plan
What people are saying about us
We're thrilled to have the support of our 50K+ clients and the industry's best

Best online Customer support I've gotten
Customer Support is amazing, agent walked me through an issue I've been dealing since...
Recognized by:
Frequently asked questions
What is the Waterfox browser?
Waterfox is an open-source web browser based on Mozilla Firefox, created as an independent project by Alex Kontos in 2011. The main feature of Waterfox is its emphasis on speed, efficiency, customization, and, most importantly, privacy, including options such as tracking protection, oblivious DNS, and the ability to disable telemetry. It’s an excellent piece of software for an average user with simple needs and developers looking for something more.
What is the Waterfox browser used for?
The Waterfox browser is used to browse the web privately and safely. You can use it for casual and professional needs, whether you want to enhance your privacy online and avoid being tracked or conduct intensive research for your business. Waterfox also features a broad range of customizable features, supports Mozilla Firefox extensions and Chrome extensions, allows you to modify the user interface to your liking, and even set how much system resources the browser should use.
Is the Waterfox browser safe?
Waterfox is a safe, reliable browser and a great alternative to popular web browsers. It’s an open-source project, meaning the source code is publicly available, and anyone can see what’s happening behind the scenes. They promise limited data collection about browsing activity, so you don’t have to worry about leaving any usage traces behind. However, always remember to be cautious and handle with care, stay informed about any security issues, update your browser to the latest version, and avoid installing any suspicious add-ons.


