Unleash the Power of Proxies with Axios
Axios is a JavaScript library that simplifies making HTTP requests in browser and Node.js environments. Find out how you can integrate Smartproxy proxies with the Axios library to build intelligent web scraping scripts.
14-day money-back option

65M+ IPs

195+ locations

99.68% success rate

Advanced proxy rotation

Unlimited connections

24/7 tech support
What is Axios?
Axios is a promise-based, open-source JavaScript library for making HTTP requests in browser and Node.js environments. It’s widely used in the web development community due to its simplicity, flexibility, and robust feature set for handling HTTP requests. Axios offers the ability to make HTTP requests, automatic JSON data transformation, HTTP header management, and the convenience of intercepting and even canceling requests. It takes minimal effort to get started, make requests, and write dynamic scripts to perform all sorts of incredible tasks.
With such a powerful tool also come significant obstacles to conquer. While the convenience of automating your requests sounds sweet, many websites will block bot traffic and make it hard to achieve the desired results. In this article, we’ll explore how you can integrate Smartproxy’s datacenter and residential proxies with the Axios library to build intelligent scripts that can easily overcome any blocks thrown at it and allow you to scrape the web.
Proxy Setup With Axios in Node.js
Install Axios
We’ll use Axios with the Node.js JavaScript environment; therefore, we must install it first. If you don’t have Node.js yet, head over to their download page and choose the correct installation based on your operating system and platform. Follow the instructions to set it up on your computer.
Next, we’ll install Axios using the Node Packet Manager (npm). In your Terminal, run the following command:
npm install axios
After a few moments, Axios will be installed and ready for use. Let’s create an example main.js file to test it out:
// Make sure to import Axios so that it can be used in the codeconst axios = require('axios');// The URL you want to make a GET request toconst url = 'https://ip.smartproxy.com/';// Making a GET request using Axiosaxios.get(url).then(response => {// Handle the successful responseconsole.log('Response:', response.data);}).catch(error => {// Handle errorsconsole.error('Error:', error.message);});
To run the code, ensure you’re in the project folder and type the following command in your Terminal:
node main.js
Here, we made a simple GET request to a target URL. If everything works correctly, you should receive a response that shows your current IP address.
That’s it for the basic setup and usage of Axios! Ready to discover how to improve our script so that it can be used for various web scraping tasks? Read on.
Set up Smartproxy proxies
Let’s get started and grab some proxies from the Smartproxy dashboard. We have several options to choose from here, mainly whether we want to use residential or datacenter proxies.
Residential proxies are an excellent option to use with Axios, as they are built on real home devices that make your connections appear natural and human-like. Smartproxy offers residential proxies with a 99.68% success rate, <0.5s response time, and a massive pool of 55M+ IPs from over 195 locations worldwide, ensuring your activities remain untraceable and anonymous.
Another great option is datacenter proxies. They are low-cost, stable, and fast proxies built on remote computers that are perfect for tasks that require quick response times and reliable connections. With our datacenter proxies, you can be sure to have a 99.99% uptime, a <0.3s response time, unlimited connections and threads, and the ability to scale your infrastructure according to your needs.
For those who require exclusive, high-performance access, dedicated proxies are the ideal choice. These proxies are assigned to a single user, ensuring maximum speed, security, and reliability without sharing resources with others. Dedicated proxies are perfect for tasks like social media management, or accessing geo-restricted content where consistency and control over the IP address are crucial.
Have you picked your favorite? Get one of our great plans and start using proxies with Axios immediately!
Integration with residential proxies
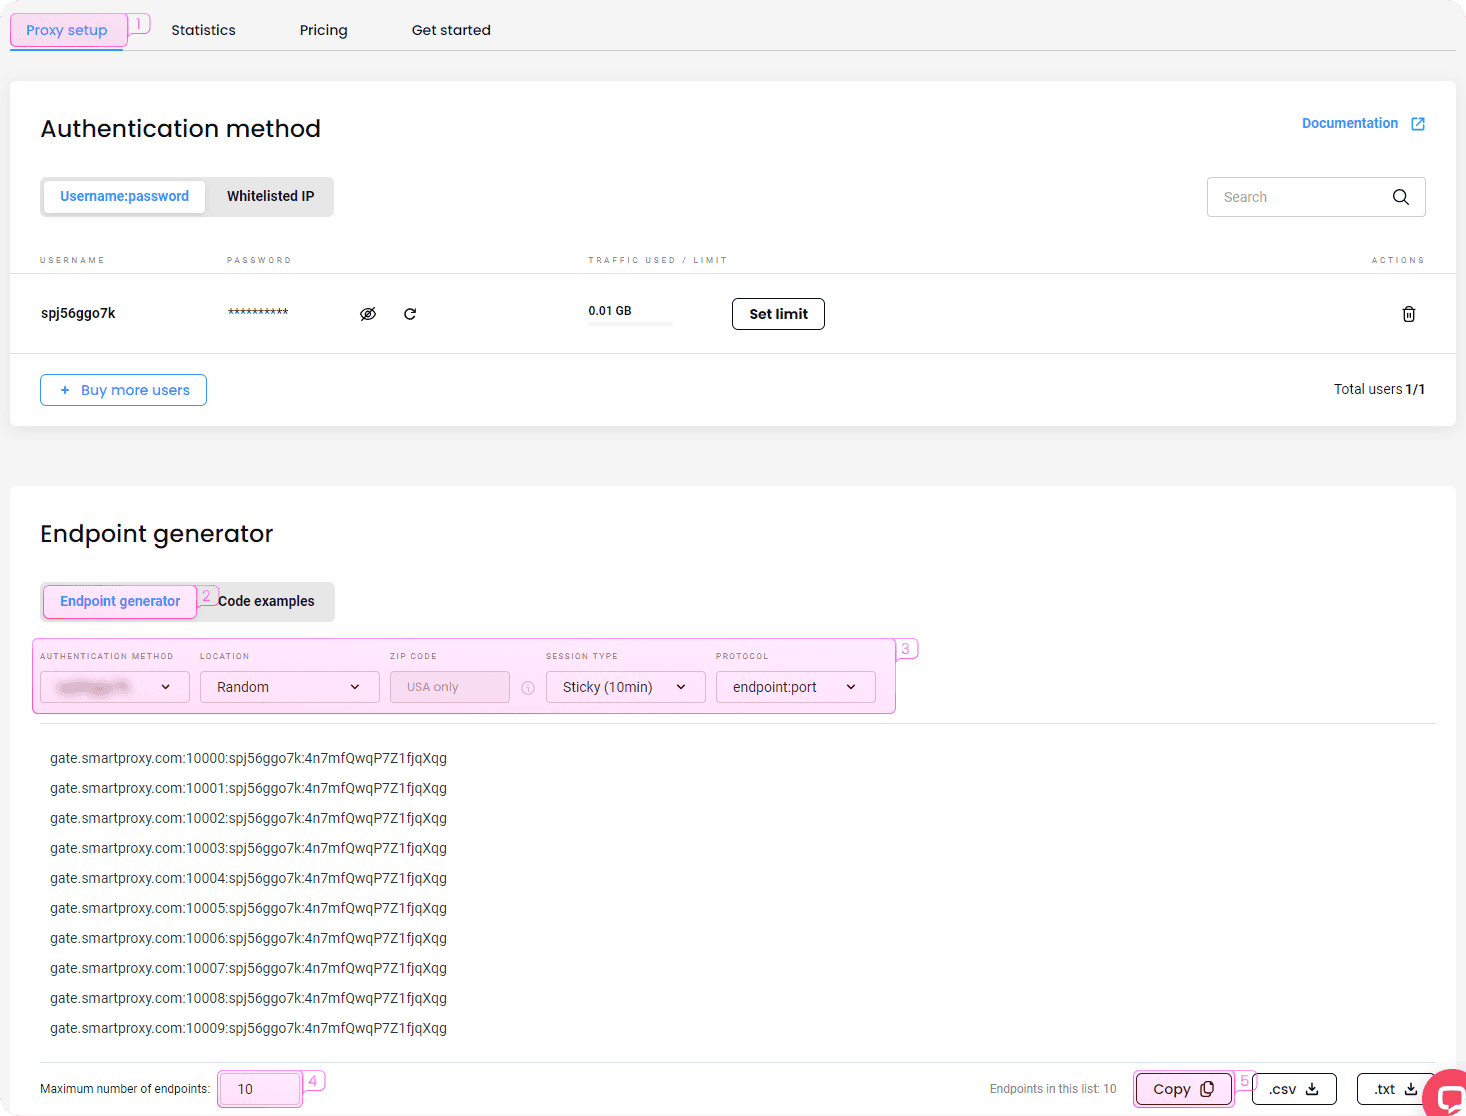
To integrate Axios with Smartproxy residential proxies, follow these steps:
- Open the proxy setup tab.
- Navigate to the Endpoint generator.
- Configure the parameters according to your needs. Set your authentication method, location, and session type. The protocol is configured in the code; therefore, you don’t need to set it to anything just yet.
- Select the number of proxy endpoints you want to generate (default – 10).
- Copy the endpoints.

Integration with datacenter proxies
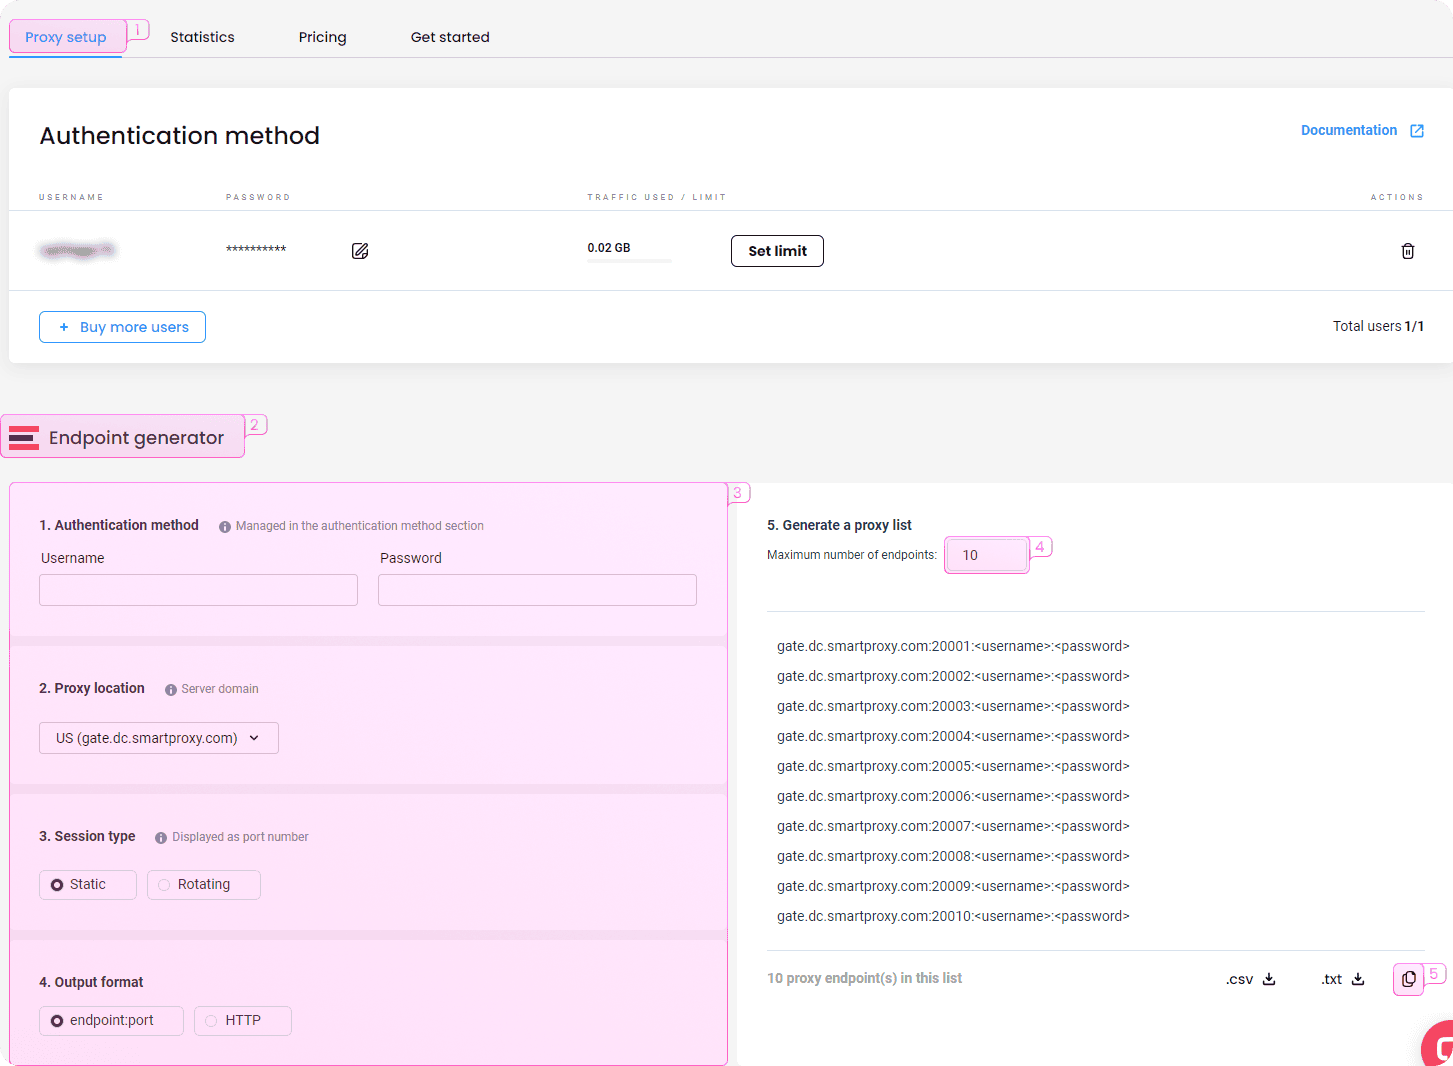
To integrate Axios with Smartproxy datacenter proxies, follow these steps:
- Open the proxy setup tab.
- Navigate to the Endpoint generator.
- Configure the parameters according to your needs. Enter your credentials for the authentication method, and set a location and session type.
- Select the number of proxy endpoints you want to generate (default – 10).
- Copy the endpoints.

Code implementation
Now, let’s return to our code and add the proxy connection details. We can’t just paste the entire endpoint, though. It needs to be sliced like a cake to match the format that Axios requires. Don’t worry; that’s relatively simple – here’s how you can separate the endpoint into parts:

So, how should these parts be implemented in the code? Right after the url variable in the axios.get() method, add a proxy configuration option. Here, we can set the protocol and the sliced up proxy information:
const axios = require('axios');// The URL you want to make a GET request toconst url = 'https://ip.smartproxy.com/';// Making a GET request using Axiosaxios.get(url,{// Add information about the proxy connectionproxy: {protocol: 'http',host: 'gate.smartproxy.com',port: 7000,username: '{user}',password: '{password}'}}).then(response => {// Success responseconsole.log(response.data);}).catch(error => {// Error responseconsole.error(error.message);});
We set up a rotating residential proxy connection to come from a new location with each request. You can run the code several times and see that a different IP address is being returned each time. If you’re using datacenter proxies, simply change the host, port, and credential information according to the ones from the dashboard. This is all you need to make basic requests with Axios and Smartproxy proxies!
What’s next? You can implement the above example into your existing scraper code or use it as a base to build something of your own. Axios has many wonderful options and possibilities for what it can do, ranging from the interception of HTTP requests, their management, and cancellation to error handling and JSON data transformation. Check out the official documentation to learn more!
Choose the best proxy plan
What people are saying about us
We're thrilled to have the support of our 50K+ clients and the industry's best

Best online Customer support I've gotten
Customer Support is amazing, agent walked me through an issue I've been dealing since...
Featured in:
Frequently asked questions
What is Axios used for?
Axios is a popular JavaScript library used for making asynchronous HTTP requests. It’s commonly employed in both browser-based applications and server-side Node.js applications. Axios simplifies and provides many customization options for sending HTTP requests and handling the responses.
Is Axios a good library?
Axios is an excellent library if you use Node.js or browser-based applications for your HTTP requests. It’s trusted and used in over 11M Github repositories, with 100K+ stars as of December 2023, so you can be sure it’s one of the best tools for the job out there.
Is Axios a server?
Axios is not a server. It’s a client-side JavaScript tool for interacting with servers, APIs, or other web services. It’s not a server itself; instead, it helps developers communicate with servers and retrieve or store information for them through the help of HTTP requests.
Be aware that any tools mentioned in this article belong to a third party, not Smartproxy. Therefore, Smartproxy will not be responsible for any of the services offered by the third-party. Make sure to thoroughly review the third-party’s policies and practices, or do your due diligence, before using or accessing any of their services.


